Quick Start
The Pursuit autopilot is designed to focus more on simple user interface with a tablet + touch style. Most users only need to click and slide buttons to conduct their missions. The following guideline presents steps to command a ground vehicle equipped with our Pursuit autopilot.
Tools
Hardware
A computer running Windows 11 or Ubuntu 18.04
Pursuit autopilot
AGV chassis with pre-installed software for Pursuit autopilot
Telemetry
Software
QGroundControl Software
The customized QGroundControl is released on our official GitHub page: https://github.com/cloudkernel-tech/qgroundcontrol/releases , and will be continuously updated.
Windows 11:
Ubuntu 18.04:
After downloading, users need to execute the following commands to activate the software and log back into the system:
sudo usermod -a -G dialout $USER
sudo apt-get remove modemmanager -y
sudo apt install gstreamer1.0-plugins-bad gstreamer1.0-libav gstreamer1.0-gl -y

# Then logout and login again to enable the change to user permissions.
chmod +x ./QGroundControl_pursuit.AppImage
./QGroundControl_pursuit.AppImage
Data Transmission Serial Port Driver (Windows 11 System Only)
download link: https://pan.baidu.com/s/1391Qkr-uLmmnIo6WG9F6qg , Code: gw84
Mission Mode (For Users)
Installation and Wiring
Attach the Pursuit autopilot to the top surface of the vehicle using 3M adhesive.
The autopilot needs to be used in conjunction with RTK and LiDAR. Install the RTK at the highest point of the unmanned vehicle using a bracket, and connect the LiDAR to the host computer.
Connect the CAN interface, RTK interface, and USB communication interface to the chassis, RTK, and host computer, respectively, according to the requirements.
Provide power to the host computer and power the autopilot using the vehicle’s 12V DC power supply.
Start the Onboard Computer ROS Nodes (required for Model A+ or above)
For machines officially configured by us, the onboard computer will automatically run the relevant nodes after startup, which is dependent on product options. For models with RTK navigation and automatic obstacle avoidance functions, users can also use a convenient script to execute them.
cd ~/catkinws_nav
bash run_pursuit_agv_nodes.sh
Start the Ground Control Software, and connect the telemetry with a micro USB cable.
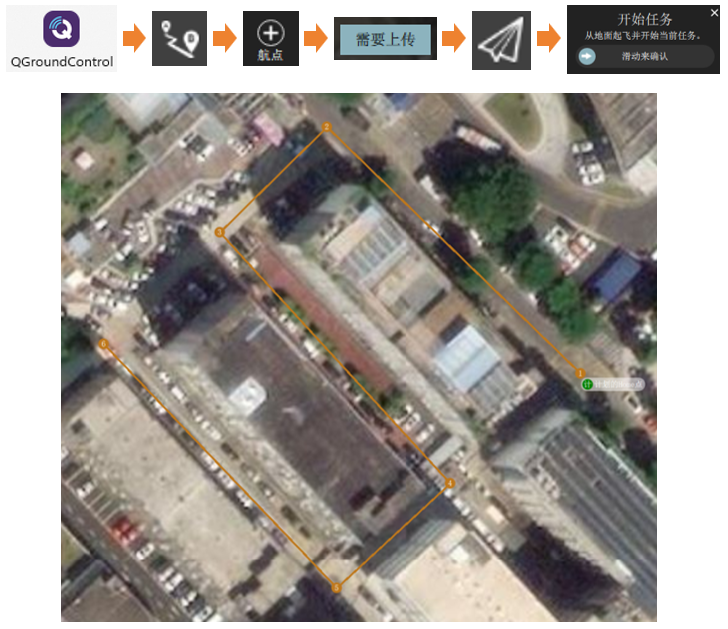
Waypoint Mission
Enter the mission setup page.
Add waypoints as shown in the figure.
Upload the waypoints, swipe right to unlock and start the mission, and the vehicle will follow the mission autonomously.
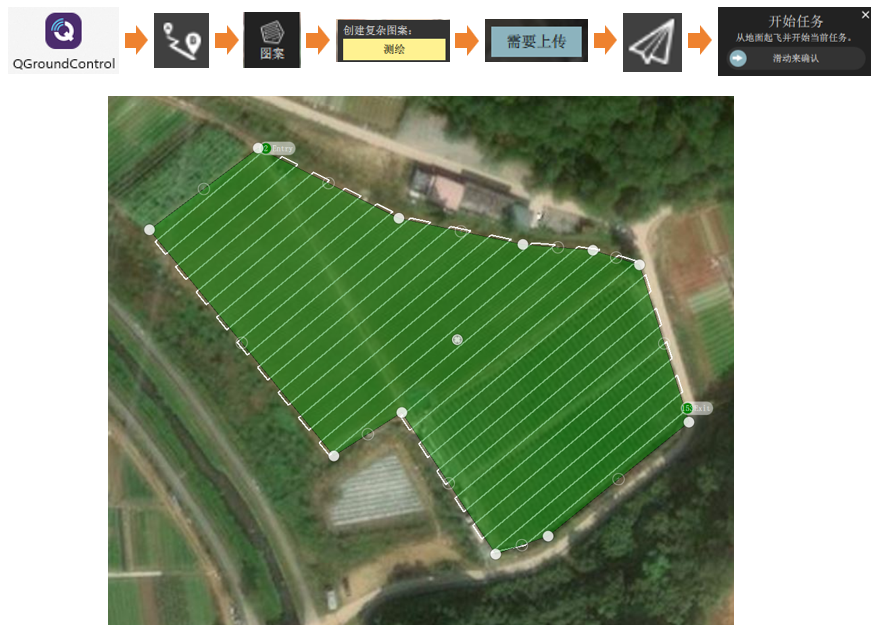
Survey Mission
Enter the mission setup page.
Add a pattern, create a mapping pattern, and select the cruise mission area as shown in the figure.
Upload the area trajectory points, swipe right to unlock and start the mission, and the vehicle will follow the generated trajectory.
Hint